
Tutorial: How to make a wood valance window treatment
I have been staring at the blank window in my living room for a whole year now. I kept thinking about doing a window valance tutorial and then kept putting it off. I finally decided I wanted to make a wooden cornice. I saw a similar version in a model home once and loved it! After doing a little googling, I decided to make one of my own, that way it would be unique. How hard could it be?
It really wasn’t that hard to make…it just took time letting the glue and paint dry. It was well worth the wait though!
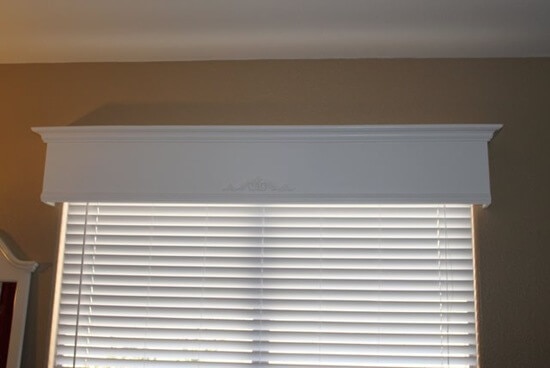
We finished it last week, and I LOOVE it! It adds the perfect touch to our living room. This trim and scroll on the wood cornice adds a wonderful look!

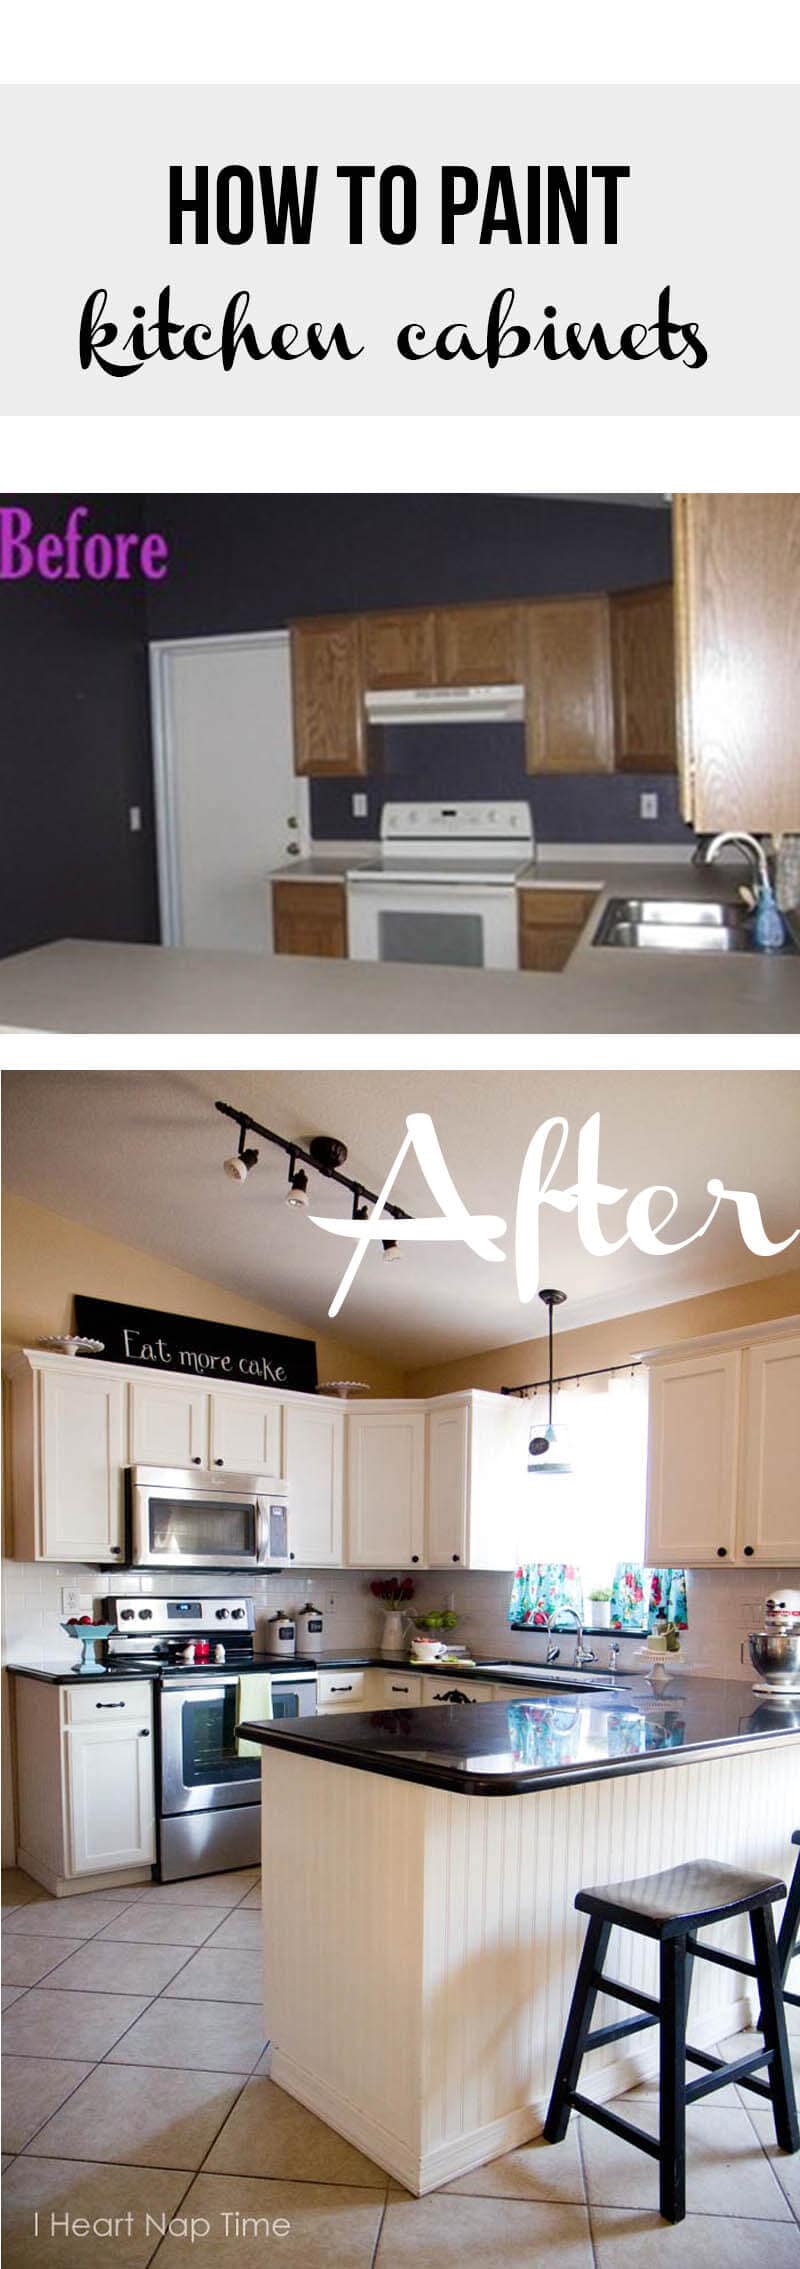
Do you recognize the crown molding? It’s the same kind we used in our kitchen makeover. It’s my favorite stuff. You can find it at Lowes.
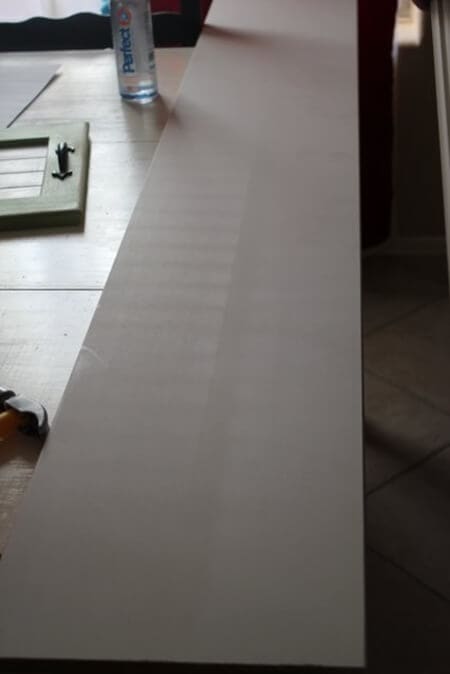
To make this you’ll need to start out with a long piece of MDF wood. Decide how long you want it and how wide. I bought a pre primed piece of MDF wood and had it cut down to 65” x 11”. Measure your window and decide what your measurements will be. I wanted a fairly large cornice so I chose 11 in. for the height but I think anywhere from 5”-12” would look great.
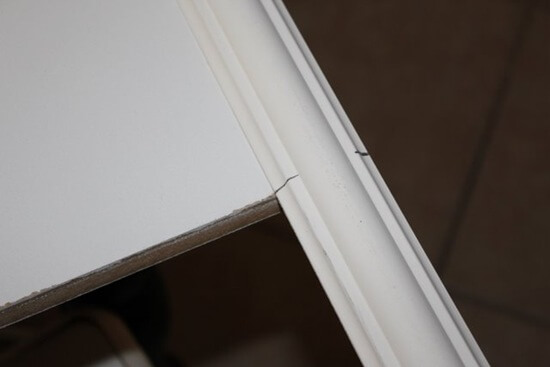
I bought some trim to place at the bottom of the board to add a little more character.
We glued that on using power grab.
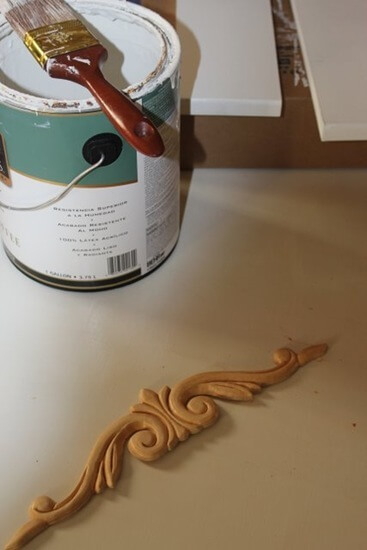
I also wanted to add one of these scrolly things to the base. I LOVE those things…whatever their called. 😉 After everything was glued I added two coats of Swiss coffee paint.
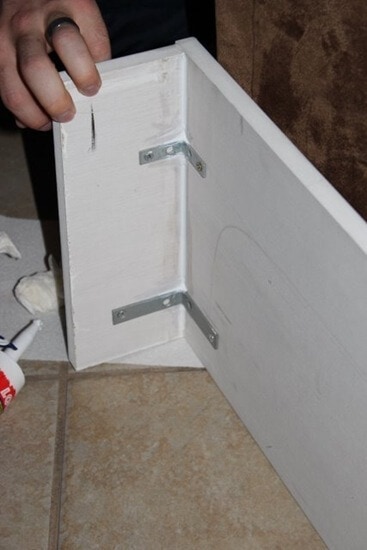
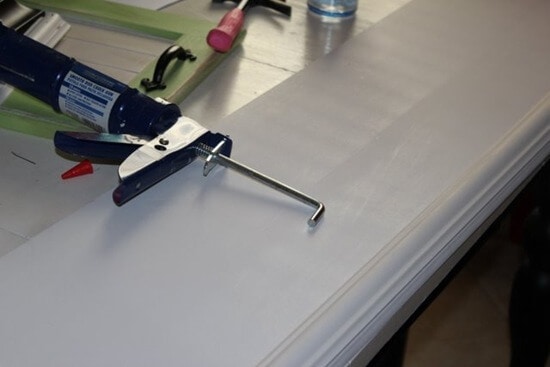
I had two 4” X 11” in. pieces as well to give the valance good depth. We attached these to the main board using L brackets to give extra support.

After everything was attached we had to fill in some gaps in between the molding. We used wood putty for filling. That stuff can work miracles I tell ya. Once that was dry we sanded it down one last time and then I added one more coat of paint to seal the deal.
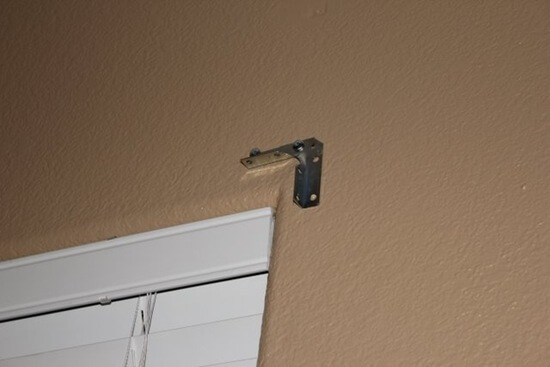
We then attached some more L brackets to the wall, so we could attach the wood cornice. Look how boring that window is. Not for long!
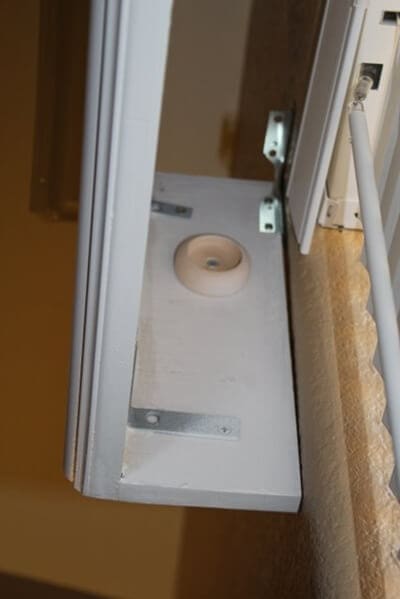
We also attached these wooden circles, so if I decided later to add curtains I could. These are found by the wooden rods at home depot. To hang curtains, you would buy a long wooden rod, and place it between the circles. Then you could hang your curtains from the rod. I found the awesome idea on All Things Thrifty. I plan to add curtains later… I just need to decide what color and find time to sew them.
So what do you think of the window treatment?!
I love how it turned out, and it looks great in our living room.
Let me know if you have any questions.
UPDATE: To see more from the living room makeover click here.
FAQ:
It was cut at a 45 degree angle. It is more difficult than cutting normal base boards or chair rails, though. The trick is that when you are cutting it, you can not just lay it flat and cut it at 45 degrees. In the cutting box the molding needs to be standing just as it will be standing when you have it on the valance or else the angle will be incorrect when you try to put them together. Does this make sense? Sorry, it is a little hard to explain.


Looks GREAT!!!!!!
I love it! It's so pretty. And I love the detail on it!
The hard work always pays off in the end! It looks really great!
Okay this just gave me courage to try! That would look awesome in my bedroom. How much Was the grand total ?
Wow. This looks great. I bet it really transforms the whole room.
Thank you so much for the inspiration. I have a couple of windows like that and I think I will try this out too! TFS…. Bug Hugs 😀
This is gorgeous!! I absolutely love it
Thanks so much!! Love this! I've been looking for a tutorial like this for a few weeks.
that's amazing!! it may be a bit of work, but so much reward! good job!
I'm showing this to the husband as soon as he gets home from work. Our windows need serious help (one year is nothing, we've been in this house for 4 and some windows don't even have coverings!!). Thanks for the tutorial and the idea!
Love it! We have a wooden cornice in our living room too after having a bare window for 4 years! Here's a link to ours: http://kirkkrew.blogspot.com/2010/12/stockings-were-hung.html
That looks awesome! I so wish I had the patience to do one of my own. Maybe I can get my dad to make me one. He is the more creative one with wood.
YAY, Jamielyn! You did a great job of "linking" me to your blog…which I adore! You did a beautiful job on the valance! 🙂
It looks awesome! So professional…love how you trimmed it out. I hope you'll share at my linky party this weekend 🙂
http://www.lovelycraftyhome.com
looks great, and super idea!
That looks great. I was thinking of making something like this for over my daughter's bed, kind of like a canopy. Thank you for sharing.
I am in LOVE With this idea!!!!
I love it! Looks FAB!
It looks fabulous! I've been planning something similar for our kitchen nook… except I'm wrapping mine in batting and fabric 😉 It'll be the finishing touch on my near finished nook! So excited.
Speaking of kitchens, do you mind telling me how much your counter-tops cost? I'm trying to get a general idea of how much it'd cost to have ours redone… thanks for sharing all your awesomeness! *B
SOOOOO awesome! I really need to do this. Doesn't seem too hard at all.
I would love to make these for my big living room windows. They would fit the style of my home and really add beauty!
Love it! Thanks for the tutorial. I have been wanting to make one to go above my bed. I will definitely be coming back to follow your steps!
I love it– I've been wanting to make fabric covered ones to add to the decor in the master bedroom… but now I'm thinking wood. Thanks for the tutorial!
Love the idea to add the rod brackets on the inside. I made valances a few years ago from old door casing and really had a hard time putting the curtains up, DUH! I should have attached brackets directly to the valance!
😉 Good thinking on your part.
You made this look so simple and fantastic! Really makes a big difference!
This is soooo great! Thanks for linking! I'll be featuring this tute on BCD on Feb 17th! thanks!
Wow, that looks great AND you make it look so simple (:
Great tutorial! I'm putting it in the Spotlight @ the PoPP. Thanks for sharing it with us.
WOW – beautiful!!!! I can think of so many places in my house I could do this to.
Very professional looking! Impressive! Thanks for linking up to Beyond the Picket Fence.
This looks really good. I have quite a few windows that need this….
thanks for sharing 🙂
Those look great! And what a great tute! Thanks for sharing …
Wow ! That really makes your window pop. Thanks for the inspiration! I think this is something I will try. Camille 🙂
LOVE this!!!
This is beautiful…thank you for the tutorial!
This is fantastic. I bookmarked this so I could come back to it in the future. I sure would love to do this to our windows in our living room! Thanks for the tutorial.
Jill of oursevendwarfs.com
Beeeeeautiful! I'm gonna be bustin' out a few of these!
Thank you so much for sharing, you clever girl!
Blessings, — Jill
blessingsofalifetime.blogspot.com
I have a really big window in my living that is begging for window treatments, but I don't know how to sew. This just might be the perfect solution, and I love how it looks on you window. I just may add this my honey to do list (I don't know how to use power tools either lol). Thanks!
That looks awesome! Now I'm trying to figure out where I could put one in my house. 🙂
Anna
http://www.askannamoseley.com
I hate to be a dork…but what brand is your Swiss Coffee paint? I'm always looking for just the right white paint and I thought I'd give this a try.
Thanks!!
Looks great! Thanks for sharing the tutorial!
Thanks so much for this! I have been searching the web for exactly this idea!!!!
Looks awesome! I keep staring at the windows in the living room wondering what to do with them – now I know! Thanks 🙂 Thanks for posting it on Thrifty Decor Chick!! 🙂
I love that. You make it sound so easy.
It adds a serious designer touch to the whole room.
I LOVE this!! I would love for you to share it at my Linky Party!
*ENTER LINKY PAR-TAY Here! *
xoxokara
You just inspired me! I think I want to do this in our living room and dining room. In our dining room we have sliders and this would dress them up. do you think if they were wider than the windows then curtains would fit? You did a great job!
Oh my you just made my day! I'm sitting in my office underneath this woven roman shade that I never covered with a fabric cornice because I'm too lazy and I realized that this would work so much better!
And it looks soooo easy!
Thank you for the tutorial! It looks great in your living room!
very nice Jamielyn! Turned out awesome. Gave it a big thumbs up!! 🙂
happy crafting!
Linda
It looks fantastic! Love!
What a great tutorial! Such a great idea to add the circles for the curtain rod now, even though you don’t have your curtains done yet! You have such a knack for forethought!
Thanks so much Janet! I have yet to make curtains… definitely on my ever growing to-do list! 🙂
Very nice! What color is your wall paint? it’s a nice contrast?
Very nice! Thanks 🙂 Thanks for posting it on Thrifty Decor Chick!!
thank you for posting this!!! it is extremely helpful.. I think i will attempt to make these cornices?valance.. I want to make the tops solid so I can put knickknacks on top 🙂
Love love love! Thank you for this amazing tutorial. Going to look into something like this for our front rooms windows. 🙂
Your Blog is amazing! One of my favorites!
Love it!
Hey there! This is my first comment here so I just wanted to give a quick shout out and say I really enjoy reading through your posts. Can you suggest any other blogs/websites/forums that cover the same topics? Thank you!
I love this! I think it is just what my living room windows need. Now to work up the courage to actually *do* it! Thanks!!!
would like to make these
Awesome! I am having trouble deciding between rod/sheers or a cornice, and this helps!
Did you use a hand saw and a miter box to cut the top molding/trim?
Did you return the small trim piece on the bottom around each corner? It looks like it is only on the front side.
When I first seen this I was what a neat place to add shelving to a room. I’m a huge house plant person and I’m always trying to find a way to get more of them near the windows. Thinking these, with a top piece of thick plaxi glass (need to keep the light coming in), would make a nice place to display some of my smaller hanging plants. I already have a custom made window box put up sideways to make a cubby above one of my windows, this will be a nice twist to a look I already have going.
I just saw this on Tip Junkie and love it. Do you think you could give me a ballpark figure as to cost to make it? Thanks!
Are the wall brackets a standard item that I can pick up at Home Depot or Lowes? I will be making one of these as soon as I get the brackets. Looks great. Thanks, Sondra
I am so trying this!!! I love it!!
On the top of it , isthat one piece of trim also ? How did you make that ?
Just what my living room windows need, I’m excited to use your fab idea to turn them from blah to beautiful!
Beautiful! Good job job! Just a question, the small trim you put at the base of the wood, did you only put it on the front, or did you do angled cuts and extend it around the sides as well, like the crown moulding? I’m worried it might look a little off if I don’t wrap it around the sides?
Love this!!! I also did one like this but put foam and a material on it love. Could also put fringe or other things on . Teresa I love your pins soooo creative keep it up!!!
May i ask how long this took to make you? I’m being overly ambitious… we’re have a get together tomorrow night at our house and I’d love to have this complete by then but my husband is pulling out his hair 🙂
Hmm… it probably took us about 6 hours total with the building, sanding and painting. Way to be ambitious! YA! Good luck! You’ll love the difference it makes!
Beautiful job on the valance! Yours is dressier than the original. Do you think a 12-foot valance would be too heavy made from MDF? My windows go to the ceiling so it might be tricky to add an extra support.
It should be fine as long as the support brackets are nailed into studs. Hope that helps!
Where did u get the wall brackets from?
Hi Susan! We got them at Lowes in the hardware isle. Hope that helps!
Oh I am absolutely doing this in my dining room!
Looks great. I too have been looking at my window and now have an idea :), only difference is I am going to do my curtains with velcro on the inside of the valance 🙂
I love this idea! I’ve been trying to find something to put over my windows in my living and dining room, and cannot find anything I like. I just showed my husband this, and I can’t wait to tackle this project!! Thanks for sharing!!
You’ll love it! It makes a huge difference! Thanks for commenting! 😀
Omg! I really want to give this a try. Thank you so much for sharing….
Hi I she where you put the dodo/trim but there is no instructions for the top? os that just wood moulding you would use for walls?
Hi Debbie! Yes, the top is just crown molding that you would use on walls! 🙂
Found this on pinterest and love it! I have three windows that are separated by about 6 inches of wall space. The total would be about 13 feet. Do you think this would work as one long piece? Also, which crown molding did you use? I followed the link to your kitchen makeover, which looks great, but I didn’t see which crown molding you used. Thanks!
Hi Roxanne! Yes, I think it could work as one long piece. I would just make sure to add extra support in the middle! I’m sorry, I don’t remember the name of the crown molding…but I bought it at Lowe’s! Good luck with your project! 🙂
I really like this and am going to pursue this to make for our house.
We loved having this wood valence window in our house! Let us know how it goes! 🙂
I really like the valances. I’m now inspired to make two of my own! Thanks for the idea & the tutorial!
You are very welcome! Thanks for stopping by, good luck with your valances!
I love your wood valence! I wonder if you could elaborate on the L bracket that you used to hang it- I’m having trouble seeing it. It looks like it is more than one if that makes sense.
Thanks
Carolynn
Hi Carolynn! We used one on each side to hang it and them one on the bottom to connect it. Hope that makes sense! 🙂
I love this idea and my windows need an upgrade! Can I ask why you didn’t hang the cornice higher, having just the bottom covering the blind hardware? Wouldn’t that make your window and ceilings appear taller and allow more light in? Just a thought.
Looking back I probably would have raised it higher to make our window and ceilings appear taller! Great suggestion! 🙂
Any recommendations for a 6 or 8 ft window im worried it would be to heavy being so much bigger then yours?
Hi Nicole! I would just make sure to get extra strong brackets to hold it up. I think it will still turn out great! 🙂
I love what you did with this – adding the extra trim really “tricked” this out. So pretty. Thanks for sharing all the details – maybe I can tackle this!
Thank you Lizzy! I loved what the valance did for my window! 🙂
Thank you so much for showing me how to do this. For under $100 I was able to build this and a TV stand. Online I found a valance for purchase at over $400. This was much easier on the pocket and much more satisfying!
I’m so glad you could use this tutorial! 🙂
Can you go into more explanation of how you hung these into the wall? I see the brackets and that you attached the bracket to the wall, but how did you attach the valence to the bracket in only a 4″ space?
Mine are ready to hang, but I am hung up on this part.
Thanks
Is “power grab” the actual name of the product you used to adhere the wood sections?
Hi Vivian! Yes, power grab is a type of adhesive. Here is a link to it: http://www.amazon.com/Henkel-841982-All-Purpose-Construction-Adhesive/dp/B000B5MKZC. 🙂
Not only does this valance look fantastic, but it is so affordable and easy to construct. This is a home run!
I love this so much! I just saw a cornice recently and want one for our living room window! Thank you for the tutorial!! What a neat bonus idea to hang the curtain rod inside it!
I couldn’t figure out what was used to hang up your wooden cornice board. Will you please explain?
We used L brackets, which you can get at the hardware store. One side of the L screws into the wall (use those expanding dry wall screw tabs if you do not have a stud there), and then the other side of the L gets screwed to the valance. 🙂
Beautiful!! I’m wondering if this could work to go above my mantle to cover the tv. Do you think it’d be possible to hang some sort of sliding doors from the valance that could close to hide the tv? Maybe a sliding rail could be attached inside the front of the valance?
I’ve never tried that, but it sounds like it could work! 🙂
Would this be a sturdy enough project to add a top board? for a shelf?