Reusable Lunch Bags (sewing tutorial)
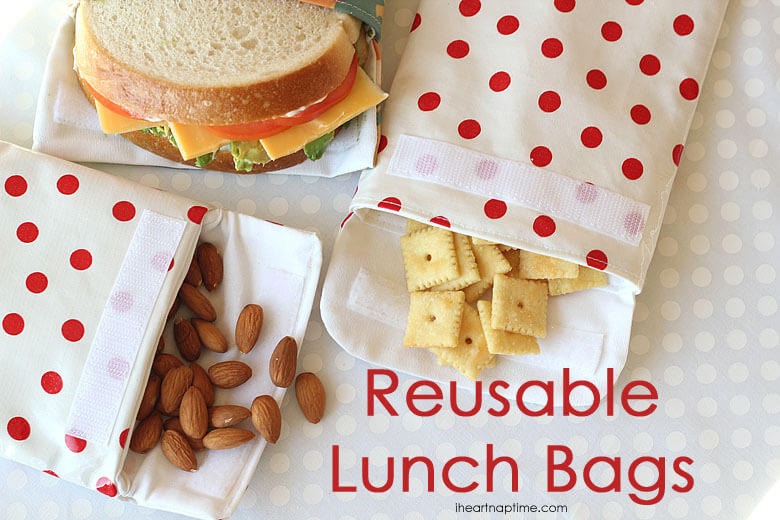
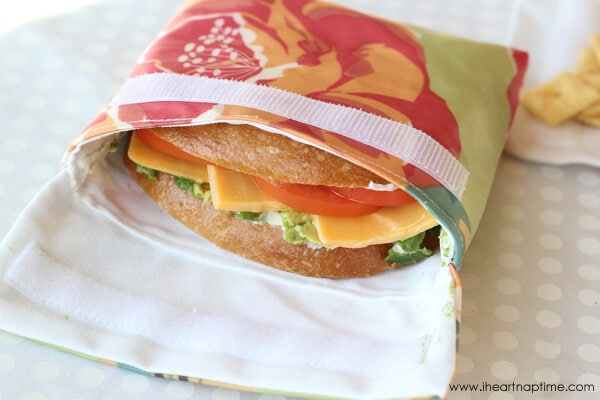
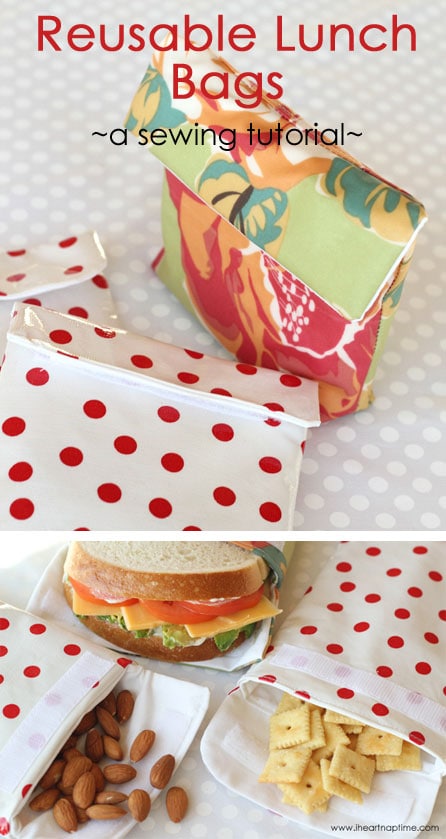
As a parent of young children, I find myself in constant need of snacks on the go. Between packing my second grader’s lunch and grabbing snacks to take with the little ones to gymnastics or on errands, I am always reaching for a plastic baggy. I stitched up a few reusable baggies and, not only are they cute, but they are the perfect, earth-friendly substitute for your typical snack storage! You can make these reusable bags in less than 30 minutes; crumbs shake out easily or you can wash them in your dishpan to use over and over! Ready to make some?
Here’s how: First, you will need to gather your supplies. I used oilcloth/laminated cotton for the outside/main fabric – it wipes off with a damp cloth, repels water, and just makes a really nice outer layer for these bags. Note: oilcloth will melt if you touch it with a hot iron – choose a piece that is as wrinkle-free as possible; if you must iron it, use a very low heat setting and work on the back of the fabric, be very careful! For the lining fabric, I used a thick canvas material that is 100% cotton. I wanted a natural material since it would be physically touching our food. You will also need a strip of velcro 1″ shorter than the width of your bag pieces. Machine sewing with oilcloth can be tricky because the outside of it typically sticks and the machine requires a Teflon foot to pull the fabric through. For this project, you will not need any special tools as the main side of the oilcloth does not come into contact with the sewing machine/sewing foot. You can also place your hands in front and behind the sewing plate while stitching to help guide the oilcloth through.
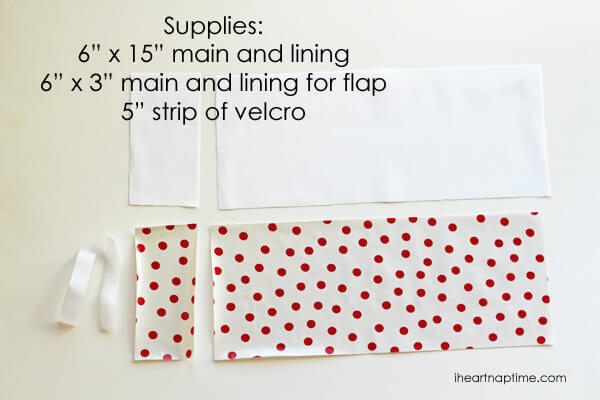
1. Cut your fabric. You can make your bags in any size. You will want to cut your fabric 3/4″ wider than the finished size and 2 x finished height + 3/4″ (for seam allowance). Cut one piece of the main fabric and one piece of lining. We also need a flap; for the flap, cut one piece of main and one piece of lining. The flap pieces should be the same width as your bag pieces and 3″ high. For this specific bag, you can reference the measurements in the image above.
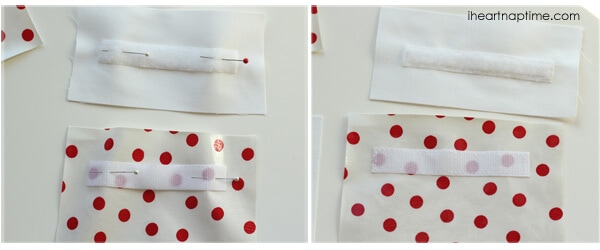
2. Attach the velcro to your project. Sew the rough piece of fabric 1″ down from the top edge of the main BAG piece, center it on the outside. Sew the soft, corresponding piece of velcro 1″ from the edge of the lining FLAP piece, centered on the right side of the fabric.
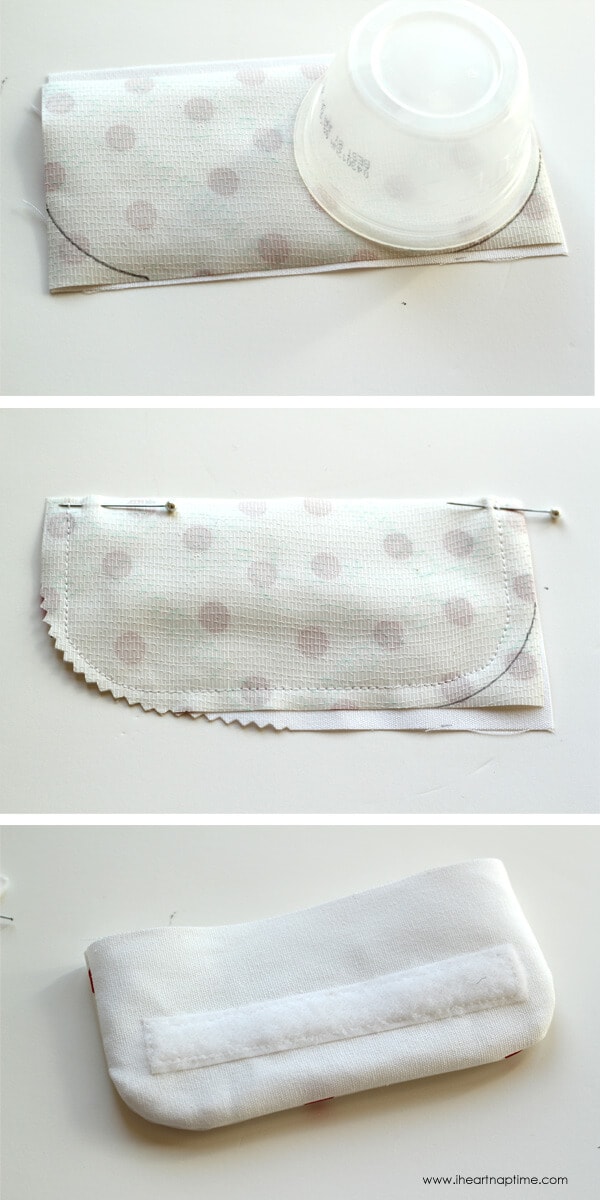
3. Sew the flap. Place the two flap pieces, right sides together, and sew around three sides, using a 1/4″ seam allowance, and leaving the top edge open. You can round the corners by tracing a round object and sewing along the curved line as shown. Trim corners and seam allowance and turn the flap right side out. Set aside.
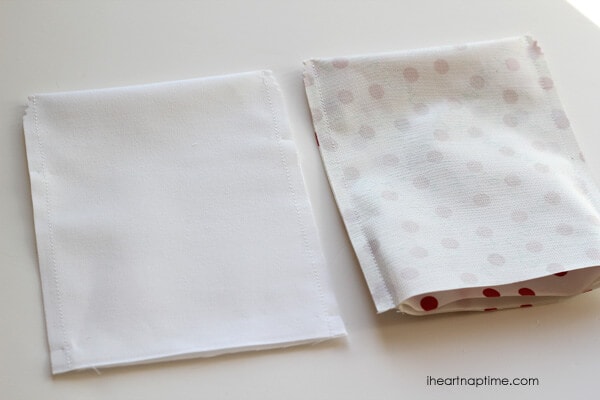
4. Sew the two bag pieces into pockets. Working on the main bag piece and the lining bag piece separately, fold the length of the bag in half, right sides together. Stitch down each side; be sure to backstitch at the beginning and end to secure the stitches. Trim the bottom corners.
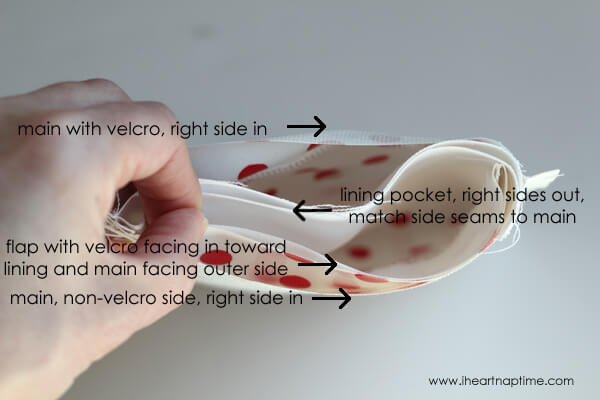
5. Prepare the bag for stitching together. Press the seams of the lining pocket flat, then turn it right side out. Slip the lining pocket inside the main pocket (which is still right sides in); match the side seams and place a couple pins just along the top edge (so that pin holes don’t show in the finished oilcloth). Now, you will need to insert your flap piece. See the diagram above to place the flap correctly. You will want the lining pocket between the two velcro pieces, and the velcro pieces should be facing each other. Raw edges for all pieces should be matched at the top.
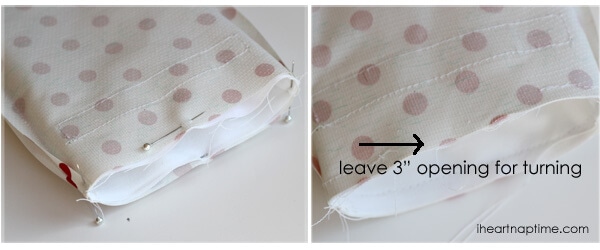
6. Stitch all the way around the top edge of the pocket, using a 1/4″ seam allowance. This small project will take a little maneuvering to get it under the needle of your sewing machine, but should be fine once you get going. Leave at least a 3-4″ opening at the center, opposite the side with the flap, for turning.
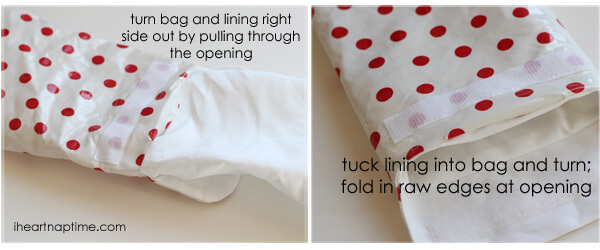
7. Now, turn the whole project right side out. Work slowly and carefully – you don’t want to tear your oilcloth by pulling too hard. Once you have the whole bag turned right side out, push the lining into place as the inside of the baggy. Fold the raw edges of your opening in and finger press in place.
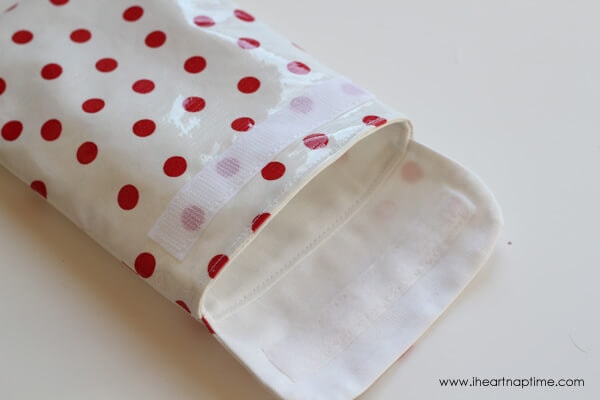
8. Last step! Now, you’re going to top stitch around the bag, right along the top. This gives the bag a finished appearance and closes up the opening at the same time. You may want to press the top of the bag before stitching, but use a cool iron, try to press the lining only, and work carefully! Also, you can turn the bag so that the lining faces out if your machine has trouble pulling through the oilcloth. Now fill that baby up and you’re ready to roll!
If you would like to make a sandwich baggy or something with some extra room inside, you will need to add another 2″ to your bag measurement width. Then, after step 4, you can make the bottom corners squared off by pinching the bottom so that the bottom seam pressing up against the side seam, then sew a line straight across that corner as shown below.
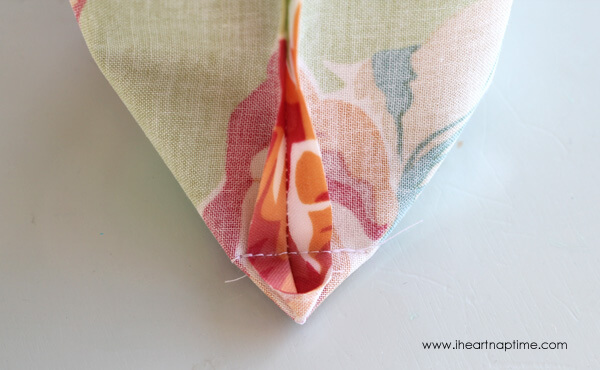
Do this for both corners, on both the main bag and lining bag pieces; trim excess fabric. Then continue with step 5.
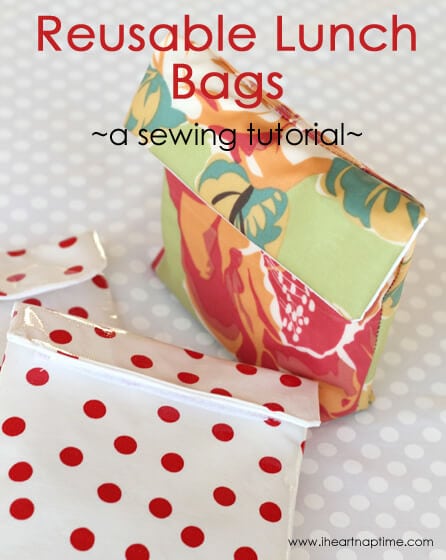
Yay! You made it – now you can whip some up for your purse and more for the lunchboxes!
What are your favorite snacks for on the go?
I’d love for you to stop over for a visit at Girl. Inspired.


These look great! I’ve been wanting to make some of these. Just might try this pattern. Thanks!
KC
Thanks for the very detailed tutorial on making these. As many plastic bags as we use, I have often thought we should invest in stock for Ziploc. We will have to give these a try.
I can’t sew! But when I learn, I’m gonna make these! TFS!
Love these, Stef!! Great tutorial. Definitely pinning for the future.
Love these! I would have to make a big set of them, but it looks doable. Do you think these are machine washable? And maybe hang to dry? Thanks for the tutorial!
Hi Annie! I think you could probably get away with machine washing these occasionally in cold water on a gentle cycle. And you’re right, you’ll want to hang them to dry. On a more regular basis, try to just shake out crumbs or give the bags a quick rinse so that you’re not putting them through the wash machine too often! Have fun sewing!
I love these! This is a Great idea to reduce the use of plastic bags!
Very, very cute Stephanie. Awesome tutorial.
Thank you so much for your enthusiasm everyone! I would love to see your finished bags!
Hello!! I don’t understand how to sew the flap after we turn over the bag. Could you please explain to me? Thanks a milliond!
These are adorable Stef! Love your technique, well done! And polka dots? Love!
These are great! I definitely need to make some of these to take my kids’ snacks with me in my purse. I absolutely hate using ziploc bags!
Those are SO cute, Stef. I love the fabrics you chose. Your projects are always so beautiful!
OMG! I want one! I have to run out and buy all the stuff at the fabric store now. 🙂
Looks like a very easy project. I will make some for our church fundraiser! Thank you!
Dear Stefanie, I love the tutorial, but got stuck on how to attach the flap. I’m sorry to say I didn’t fully understand the diagram. does the flap go in with velcro on the outside? Does it go in the middle of the main part? And where should I sew? Sorry for the beginner questions…
Hi Maya! Thanks for the question! You’ll have three pieces to sew together around the top perimeter – the main pocket, the lining pocket, and the flap. Turn your main pocket inside out so that the right sides are facing in. Place the lining pocket (right sides out) in the center of the main pocket. Now, place the flap between one side of the lining pocket and one side of the main pocket (place it on the side opposite the one with the velcro on the main fabric pocket). On the flap, the lining side with the velcro on it will face toward the center (or toward the lining pocket) and the outside of the flap with the main fabric on it will face toward the outer side. All of the raw edges should line up. Then stitch around the top perimeter. The picture above step #5 shows the arrangement of the different pieces. The picture below step #5 shows where to stitch. I hope that helps!! If you still need help, you can email me at [email protected] Thanks!
When you square off the corners for the sandwich bags, how far from the corner did you stitch?
im lost. i dont see a pic on where/when/how to insert the flap. also how did u turn it inside out?..
I’m incredibly lost as well. Maya commented on this issue, but the answer was still not clear. The pics do not show where actually to sew…I attempted to figure it out and then turned the bag and the flap remained inside. The pics on where to sew need to show from the inside as well. And if you look at the pic with all the arrows directing which layer goes where, it appears there is an additional layer of fabric, so that makes it even more confusing. This tutorial is not clear…and I’ve been sewing for almost a decade- I’m not a beginner!
Hi Beverly! This was a guest post from several years ago so I’m not sure on the answer. But you can definitely send her an email at [email protected] for answers to your questions. 🙂
We use the all natural (runny) peanut butter and other nut butters that are not thickened with fillers. I am wondering how food like that (that does not really stay inside the bread, and is often all over the container the sandwich is in) would fare in these type sandwich bags. Does the mess seep through the bag (and stain it?) or does the oil cloth contain that?
These are lovely!! Such a great eco-friendly idea!!! Remember to turn them inside out when washing!!!
Great tip! Thanks for commenting Ez!
Hi. Great little bag idea. Very good tutorial too. My idea is to use old vinyl tablecloths inside and out. That way it would wipe clean inside too.
Great idea Lauren!
I have been looking for something like this for a long time! Thanks for sharing! Do you get the laminated fabric at your local fabric store? Thanks again 🙂
Hi, i just found your blog and i love it. I have one to and i am doing a giveaway, hope you can see it and participate :3
I make them with just two layers of regular ole cotton fabric. This way I can turn them inside out and wash and dry in my machine without any worries. The oilcloth would be nice for those messier goopy pbjs bit the cotton works…. I use scraps.
i was wondering could u use pul for this project instead of the oil cloth and canvas.
If you can find it to be food-safe, yes!
These are so cute! Planning to make a few for Christmas gifts this year.
I’ll be linking here on my DIY Christmas Gift Round UP over at hampersandhiccups.com
Thanks for the great tutorial
Katelynn, hampersandhiccups.com
Love making little sewing tutorials for Christmas gifts! We love these reusable lunch bags! Thanks for linking up! 🙂
I got so excited about my post, I accidentally published it a few days early! Blaming the pregnancy brain, o’er here!
Here’s the link!
https://www.hampersandhiccups.com/diy-gifts/
Happy sewing and DIY-ing to all!
Katelynn, hampersandhiccups.com
I love these planning on making I’m just wondering how fresh they keep sandwiches as I make school lunches the night before and don’t want to send the boy in with stale bread?
They should still be good the next day if you make them the night before! 🙂