
How to make inexpensive NO SEW roman shades
Today I’m going to show you how to make inexpensive NO-SEW roman shades!
Turn a basic curtain into a beautiful roman shade in just a few simple steps!
I’ve been wanting to make roman shades for quite awhile but to be honest they intimidated me. I can sew, but I am by no means a professional. Every tutorial I saw for roman shades just looked daunting! I thought it would take me years to finish them. Then I saw this post on Little House Big Plans where they used old blinds and I thought -GENIUS! I already had blinds and curtains hanging up in my sons room, so one night I decided to tackle the project. It ended up taking me about 2 hours. I was taking pictures along the way, so you may even be able to finish them sooner than that! To buy all the supplies to make the other roman shades I was planning on it would actually be cheaper to just buy cheap blinds from Walmart or Target if you didn’t have any on hand.

NO-SEW roman shades
Supplies:
- cheap blinds
- scissors
- curtain (or fabric if you would like to make you’re own) -I bought these black out curtains from Target.
- clothespins
- fabric glue
- hot glue
Instructions:
1. The first thing you’ll need to do is measure your window and determine your fabric length. Decide how wide and long you want your shades to be. I wanted my shades to sit about 5 inches above the molding so the room would feel taller. You could place the blinds directly on the molding though.
2. Lay blinds out on the ground and cut the “ladder” string. You will throw this top string away. Make sure not to cut the thicker string that is connecting all the blinds in the middle.
3. Remove the caps on the bottom part of the blinds so you can release the strings.
4. Untie the knot and pull the strings away from the bottom bar.

5. Figure out how many pleats you want, depending on the length of the window. I placed my blinds 10 inches a part. Then remove the remaining blinds and discard. Pull the string back through the bottom bar and tie a knot once you have the right length.

6. Then lay the blinds on top of your curtain. If you need to hem your curtain, do it at this point. You could even fold in the edges and use the no-sew glue. My curtains were the same size as my window, so I didn’t need to cut anything but the bottom.

Use your measuring tape to mark the space between the blinds.

Then cut the remaining fabric at the bottom. My string was a little short, so I tied on some string to make it longer. No one will ever know. 😉

Then fold the bottom piece of fabric over the bottom bar and hot glue it on.

Then secure the top base to the fabric with hot glue. Make sure to glue the fabric on the front of the blinds base (at the top) so you can still hang it up. 🙂 Next you’re going to glue down the blinds. Make sure to place the glue on the curved side.

Make sure not to glue the string! Once you have everything glued on, you can pull the strings a little to make sure none of them are glued on.

Secure the blinds with clothespins and allow the glue to dry overnight. Then the next day you can hang up the shades right inside the brackets. They should just slide right in. When it’s installed, you’ll shade will be able to slide up and down. Here’s what they look like down.

Then pull the blinds up and you have fully functional roman shades! If you already have blinds and curtains up, these won’t cost you a penny!

More tutorials on how to make roman shades:
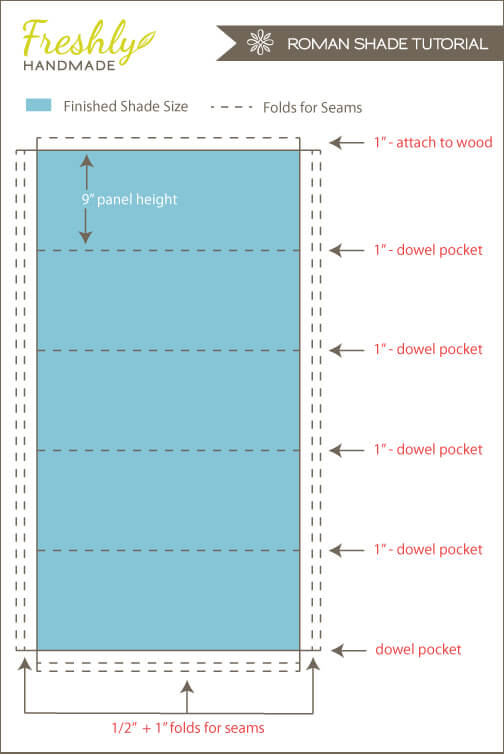
Roman shade tutorial -if you know how to sew and want to make the one’s with the wooden dowels, this is a great tutorial!
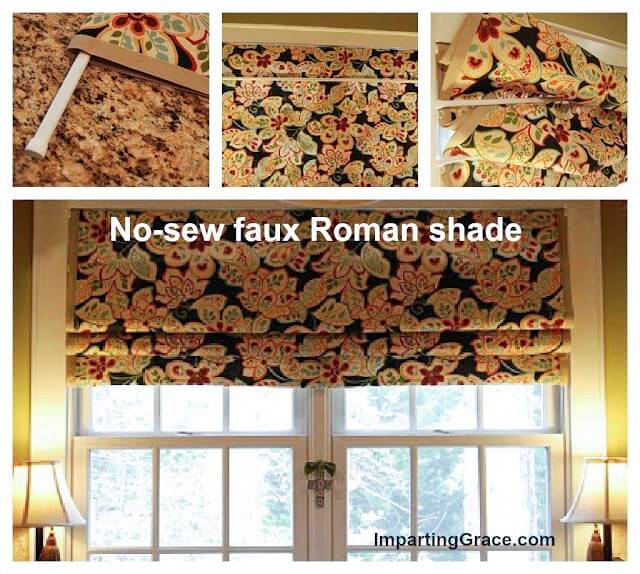
Faux roman shade tutorial using tension rods – great if you don’t need your’s to pull up and down.


This Roman Shade is so awesome. These mini-blinds always get bent and need to be replaced. What a great way to salvage an old one. Or you can pick up a new one for about $5 cut to size from Home Depot.
Thanks for your comment Maggie! I agree, our blinds definitely needed to be replaced so I was happy I could put them to good use!
Not sure I understand, will probably have to go over and over this till I work out exactly how to do this, but it seems like a wonderful idea!
How do you know which string is the ‘Ladder’ string?
Hi Wendy! It’s the two thin strings that are connected around the main pull string, does that make sense?!
You are a genius … this idea is genius and just solved a problem for my dining room! I heart you … not in a creepy way 🙂
Haha I’m glad you’ve found a solution for your dining room! Thanks for stopping by Brenda! 🙂
This is fantastic. I have been wanting to make Roman shades for years but didn’t know how to go about it. You don’t know how much I appreciate this. Thanks.
I’m so glad you will be able to use this tutorial! I had been wanted to make Roman shades for a long time but it seemed daunting. I was so happy to be able to reuse my sons old blinds and find a simple tutorial! Good luck with yours! 🙂
COULD YOU USE FLAT WOOD BLINDS AS WELL?
Hi Melissa! You may be able to, but they might be too thick. The cheap ones are very flexible so it works perfectly. 🙂
Hi! Just did this project and it looks fabulous. I especially love that I didn’t have to sew. I just used hem tape on the edges.
I have a question though, what about those clips that go into the brackets to secure the blind into place; did you not use it once you turned the blinds into shades? Mine still feel like they need it, but I’m not really sure how to get those clips in now that the top bar is all glued with fabric.
Hi Mariam! We hung ours up with the clips onto the wall. You might have to pull the fabric back a little and re-glue it. I left space so we could hang it up! 🙂
Great idea! I am attempting to make one 106″ wide and can’t figure out what to use that wide for the fold supports. The blind slats are not stiff enough. Any good ideas that will not cost too much?
Hi Terrie! Maybe you could use thin long wooden sticks. You can find them at Hobby Lobby and Lowes!
Hi Jamielyn,
I am about to do this, but wondering if the shade will sag because the slats are not at all supportive?
Thanks!
Hi! I didn’t have a problem with the shade sagging, but if you are worried about it you can use the small wooden sticks as well. 🙂
How about doubling up the slats?
Hi Robin! I had a commenter share that to make the slats stronger, they layered three of the slats glued together. This did not have the bulk of wooden slats, but was be as strong as the wooden ones are. Hope that helps. 🙂
My string is a little too short too, but I found that adding another little piece of string on the end affects the ability of the shade to close because the knot won’t go through the holes in the blinds. Did you run into this problem? Yours seems to close fine in the pictures.
Hi Marissa! My string was actually pretty long so I didn’t run into this problem. If the knot won’t go through the holes, you could try using an extra strong glue!
I’m excited to try these! One question: does the final curtain sit inside the frame of the window? Your finished picture seems to hide the window frame with curtain but I don’t understand how. Where is the mini blind bracket mounted, above the window or within the window frame?
Hi Betsy! I hung the brackets above the window on the wall but you can put them just about the wood frame too. 🙂
To make the slats stronger, layer three of the slats glued together. This will not have the bulk of wooden slats, but should be as strong as the wooden ones are.
Thanks for the tip Pam! 🙂
I can’t wait to try this, looks better than regular blinds !! Thank u
Do you think this could work with lace or voile? Nice insect screens for summer.. 🙂
I think lace or voile would be too thin, but I have never tried it before!
Can’t wait to try these Roman Shades and get rid of my blinds!!!
This was a great tutorial. My shades came out great! The blind cost $3.50 at Walmart. Ikea had a nice fabric for about $4.50 a yard. Thanks for posting this idea!
I’m so glad it turned out well for you! Thanks for your comment Stacy! 🙂
OMG you are a genius! I’ve been wishing and working my butt off to save up for some wooden blinds (because they were the only thing I thought would survive my hoard of children), but I’m pretty sure you just saved me a ton of money! Thank you sooooooooo much! I can’t wait to go make some right now!
Good luck with your curtains! Thanks for your nice comment. 🙂
Hi! I am about to give this a try because we just purchased a used RV and I am doing some remodeling. Now here’s my question. Any idea how far out these shades stick when they are drawn up? The reason I ask is that my RV windows have these wooden frames built around them which I have recovered with new fabric, but the reason they’re there is to keep the blinds from swinging all over the place. My plan is to use the existing RV blinds and make roman shades out of them, but I want to make sure there is enough room for them to be drawn up behind the wooden frame. Do you think if I make the slats closer together it would help? Thanks so much, I can’t wait to see how my project turns out!
Hi Linz! I would have to see it to give you a better answer. You shouldn’t have any problem with the shades sticking out if you are using the same blinds that are there now! 🙂
They showed this on the home show. A suggestion for fabric is to use sheets. Think of all the possibilities? One of my favorite patterns is one by Ralph Lauren, Kathleen. Just buy flat sheets, you could attach blackout fabric to the back for darkening and to keep it from fading. Awesome!
This is a fantastic upcycle! I’m trying this as soon as I can. I NEVER post comments on any blog but you have managed to wow me!
How do you access the pull cord?
Thank you for showing the easy way making Roman Shades and recycling old blinds.
Would the hot glue work just as well to attach the blinds to the fabric or would you recommend only using the fabric glue for this step?
I would only recommend fabric glue (white school glue says it’s fabric-safe), because hot glue will stiffen the fabric and make those areas not look the same as the rest of the shades.
Love your ideas
This is such a perfect tutorial! Making window treatments for my hubby’s “man cave”our den. But, I felt like such a chump! I spent sooo much time trying to tie extra string to the end of my cord for extra length. Ended up using E600 to glue the two strings together—which cause a bulky spot, so i had to individually cut the hole part of the shades a little bigger to accommodate. So, the hubs comes home and I’m showing him my progress, and he makes the simple comment: “oh, so you just used the pull string cord to give you that extra length, that was smart!” ummm… yeah… oops. Didn’t even THINK about using the extra cord length from the pull cord instead of fixing a foreign string to the end of the blinds. I recommend it if you have the option!
Hello. The blinds I’m using have two thin strings (on on the front side and one on the back side of the blinds, and then one thicker one thicker string that runs through the middle of each slat. Just to be clear, I will cut and remove BOTH of the thin strings, right?
Right!
HI Jamielyn,
I’ve read so my tutorials about diy roman shades and though they were all fairly easy, I think yours was at the top of that list. Thank you.
This was a perfect idea for my house. Total cost is just at $10, only cause I bought premade room darkening curtain panels. I will be making them tonight.
Thank you!!
The string used to pull the shades up and down, what do you do with it? Does it hang behind the shade?
I am going to make these for our bedroom, just need clarification.
many thanks!
Shiela M. Jarvis
When the shades are closed, it will have very little visible. When they are opened, it hangs on the back, to the side. You can see the example in the picture of my son’s room with the sun shining in. 🙂
You made this project look very easy. Can’t wait to try it.
My husband and I are thinking abou making these in our living room and dining room (9 Windows). Before we embark on this project I wanted to ask how the blinds are holding up with daily use. Four of the shades would be raised and lowered frequently.
Over the past year, some of the glue has come up, so I would use a very strong (heavy duty) glue to insure they’ll hold up with the daily use. But otherwise, they are working out great!
Would this work with cordless blinds?
I’m afraid not — it’s the cords that make this work. 🙂
HI Jamielyn,
What a wonderful post! I am a novice crafty person, so I need to ask a dumb question….my window is 36″ long. How many folds should I have in my no sew roman shades? What do you recommend?
Thank you 🙂
It depends on how far you the folds spaced apart and if you want a few extra. I’d say you’d want the folds spaced apart at least six inches and add a few extra inches at the bottom, so you’ll wind up with 6 to 7 (or maybe eight!) folds total. 🙂
Following your Roamn shade tutorial. Can you cover both sides of the blinds to have the back side covered/colored also?
Hi Julia! I haven’t tried that, but it may be hard to pull the blinds up.
Do you think it would work with the cordless blinds? They are the same style as you used but cordless. I would love to cover the boring white blinds and turn them into roman shades. Thanks for any opinion.
I don’t think it would work very well with cordless blinds unfortunately! It’s the cords that make this work. 🙂
I have made a few sets before, but the only mini blinds I have left are metal. Do you think the glue will adhere to the metal blinds?
Hi Bailey! Probably not, unfortunately!
Hi! Thanks for your great tutorial – I was excited to find it, and one with pictures to boot.
How have these shades held up for you since you posted this tutorial? I am very eager to make them, but the only thing holding me back from trying it out is my curiosity – did the glue hold up for multiple draws of the shade? Are they falling apart? Are they one of the best things you ever made? Would you suggest any changes or revisions?
Thank you!
Hi Sarah! They have held up well. Over time I’ve had to re apply glue here and there, but no other complaints!
This is brilliant!
Thank you!
Hello, I made one of these last night. I used extra blinds to reinforce them but it is not on the window yet. One problem I noticed this morning was that you can see the glue on the front side. maybe I used too much glue (first timer here!) or I just need to wait until it is completely dry. Any ideas on how to cover up the glue? don’t want to start over again and waste the fabric.
Hi Taina! I hope your glue has dried clear now that it is completely dry! If it is still showing on the front side, I’m not sure how to best cover up the glue. You may have used a little too much glue or used too thin of a fabric if the glue is showing.